Hey buddy! I’m going to walk you through mounting a fish finder transducer on your boat. It might seem a bit complex at first, but don’t worry, I’ve got you covered with a step-by-step guide. We’ll look at the transom, in-hull, and thru-hull mounts, along with specific FAQs for top fish finder transducer brands.
Transom Mount Transducer Installation
Transom mount transducers are a popular choice for many boaters due to their user-friendly installation and removal. These devices attach to the back of the boat’s transom using a bracket and screws. Here is the detailed guide on the placement and installation of the transom transducer.
Where to Mount Transducer on Transom
Placement is critical for mounting the transducer on the transom for accurate and uninterrupted readings. Here’s a guide to ensure optimal placement on the transom:
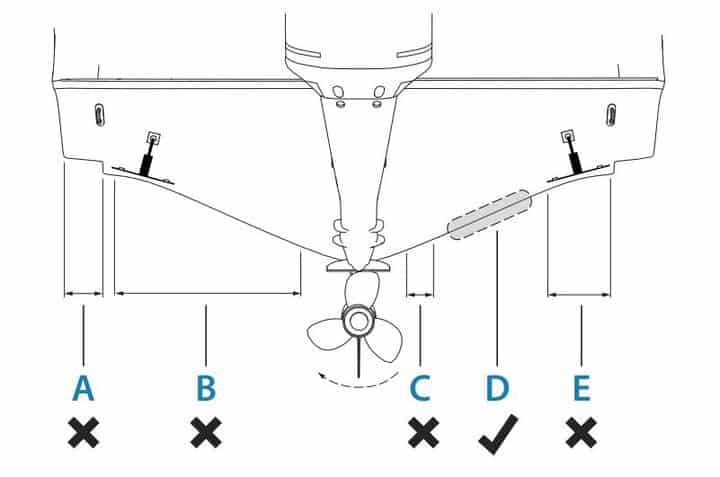
- Central Location: Aim to install the transducer as close to the centerline of the boat as possible. Typically, this is on the starboard (right) side due to the downward swing of the propeller on most boats.
- Distance from Propeller: For boats with outboard or inboard/outboard motors, ensure the transducer is at least 15 inches (38 cm) away from the propeller to avoid interference and potential damage.
- Avoiding Propeller Path: On single-drive boats, do not place the transducer in the path of the propeller. The turbulence caused by the transducer can lead to cavitation, degrading boat performance and potentially damaging the propeller.
- Steer Clear of Turbulence: Avoid areas downstream of strakes, struts, fittings, water intake or discharge ports, or anything else that creates air bubbles or turbulent water. Such disturbances can lead to inaccurate readings.
- Placement on Twin-Drive Boats: If your boat has twin drives, the ideal location for the transducer is between the drives, if feasible.
- Consider Launch and Haul Actions: Avoid areas where the transducer might be knocked or jarred during launching, hauling, or storing the boat.
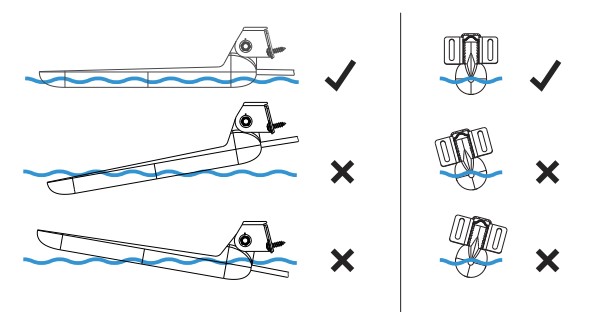
- Orientation: Ensure the transducer is parallel with the waterline when the boat is in the water. This helps maintain consistent contact with the water and ensures the most accurate readings.

Where to Place Transom Transducer Below the Hull
The ideal location for the transom transducer below the hull needs to be:
- Parallel to the bottom of your hull: This ensures consistent water flow over the transducer’s face and avoids air bubbles. You can achieve this by aligning a straight edge with the hull bottom and matching the angle of the transducer.
- Level with the waterline when viewed from the back: This is crucial for optimal side-imaging performance. On V-bottom boats, it can be tricky as they rarely sit level on trailers. Use a horizontal line on your transom (like a jackplate edge) and a framing square to adjust the side-to-side level of the transducer.
- Flush with or slightly below (up to 1/8″) the hull bottom: If you lose the bottom reading at speed, the recommendation is to lower the transducer in small increments (like 1/8” at a time) until performance improves. This adjustment helps maintain contact with the water even as the boat’s angle changes with speed.
- Avoiding excessive depth: Mounting the transducer too low increases drag, exposes it to debris, and can even create turbulence that hinders performance. Look for a roostertail of white water from the transducer’s nose as a sign it’s too low.

Installation Steps
Installing a transom-mounted transducer involves several steps to ensure it operates effectively and safely. Here’s a step-by-step guide:
- Gather Tools: Collect transducer, mounting hardware, drill, bits, marine sealant, screwdriver, wrench, tape, level, and marker.
- Confirm Location: Recheck the transducer’s position as determined earlier. Ensure it’s away from any obstructions, in a spot with minimal turbulence, and not in the path of the propeller.
- Mock Setup: Temporarily place transducer and bracket, mark screw positions ensuring level alignment.
- Drilling: Drill holes at the marked spots, using a drill bit slightly smaller than the mounting screws for a tight fit.
- Apply Sealant: Apply marine sealant to the holes to prevent water from seeping into the transom.
- Attach Bracket: Align and screw in the bracket, but keep it loose for adjustments.
- Adjust Transducer: Slide in the transducer and align it parallel to the hull. The transducer should be submerged in water when the boat is at rest for optimal performance.
- Tighten Everything: Once everything is aligned correctly, tighten the screws on the bracket and the transducer.
- Route Cable: Route the transducer cable to the fish finder display inside the boat. Avoid pinch points, and secure with clamps or ties.
- Connect Display: Attach the transducer to the display unit as per instructions and ensure a tight connection.
- Test the Setup: Test the transducer in shallow water before going out deeper to ensure it’s working correctly. Look for clear readings and adjust the transducer angle if necessary.
- Final Checks: Confirm tight screws, dry sealant, and secure cable.
Safety Tip: Wear safety glasses while drilling and adhere to tool safety guidelines.
In-Hull Transducer Installation
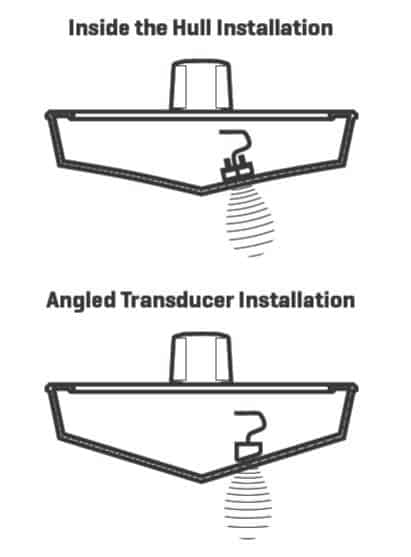
In-hull transducer attaches to the interior floor of the hull without any drilling. In-hull transducers are suitable for solid fiberglass hulls. They’re not recommended for metal, wood, or cored fiberglass hulls due to the interference these materials can cause with the sonar signal.
Where to Mount In-Hull Transducer
Mounting an in-hull transducer correctly is crucial for accurate sonar readings. Here are the key locations and considerations for mounting:
- Solid Fiberglass Area: The transducer should be mounted over a solid fiberglass section of the hull. Avoid areas with wood, metal, or cored fiberglass as these materials can interfere with the sonar signal.
- Bilge Near the Transom: A common placement is in the bilge area (the lowest part inside the hull) near the transom. This location is usually a single thickness of fiberglass and is in constant contact with water.
- Away from Interference: Avoid mounting the transducer over hull features that increase thickness, like strakes or ribs, or near fittings, water intake or discharge ports that can disturb the water and interfere with the signal.
- Near the Centerline: Mounting the transducer near the keel or centerline of the boat can provide a more stable and consistent reading, but ensure it’s not blocked by the keel causing shadow zones or echoes.
- Flat as Possible: The mounting surface should be as flat as possible to ensure the transducer is parallel to the waterline when the boat is at rest, providing more accurate readings.
- Check Deadrise Angle: Ensure the placement aligns with the allowable deadrise angle for your specific transducer model. This angle relates to how much the hull slants away from a horizontal plane at the transducer’s mounting location.

Installation Steps
To install an in-hull transducer, follow these brief steps:
- Choose Location: Select a spot inside the hull in constant contact with water, away from interference, and over solid fiberglass.
- Test Position: Temporarily place the transducer at the selected location. Test it at various speeds to ensure it provides strong and consistent readings.
- Prepare Surface: Clean the area thoroughly. It should be dry and free from grease or debris.
- Apply Adhesive: Mix and apply the epoxy or adhesive recommended by the manufacturer. Ensure no bubbles or voids form.
- Mount Transducer: Press the transducer firmly into the adhesive, ensuring it’s level and parallel to the waterline.
- Allow to Cure: Wait for the adhesive to fully cure as per the manufacturer’s instructions.
- Connect Cables: Route the transducer cable to the fish finder display unit and connect it, securing the cable away from areas where it might get pinched or damaged.
- Test: Once installed and connected, test the transducer again to ensure it’s functioning correctly.
Thru-Hull Transducer Installation
A thru-hull transducer is mounted directly through the hull of the boat, making it a more complex and permanent solution compared to transom or in-hull types. Thru-hull transducers are preferred for larger, more sophisticated vessels, such as cruising sailboats, powerboats, and commercial fishing boats. It’s especially suitable for boats that are frequently used in deep waters and require highly accurate and reliable sonar readings.
The process involves drilling a hole in the hull, which requires careful consideration and precision to avoid damaging the boat’s structure. The transducer is fitted into this hole, ensuring direct contact with the water outside, which allows for clearer and more precise sonar signals. A key benefit of this method is the reduction of signal interference, as the transducer isn’t affected by the air, hull material, or water turbulence, unlike in-hull or transom-mounted types.
Where to Mount Thru-Hull Transducer
Mounting a thru-hull transducer requires careful consideration of the vessel’s type and hull design to ensure optimal performance and avoid interference. Here’s where to mount the transducer based on different boat types:
- Outboard and Sterndrive Vessels: Mount the transducer in front of and close to the engine or engines. This positioning helps avoid turbulence and ensures a clearer signal.
- Inboard Vessels: Place the transducer in front of the engine, far from the propeller and shaft to avoid disturbances caused by engine vibration and propeller cavitation.
- Step-Hull Vessels: For boats with stepped hulls, mount the transducer in front of the first step to ensure it remains in contact with the water, even at high speeds.
- Full-Keel Vessels: On these types of boats, the transducer should be slightly angled toward the bow and parallel to the centerline to ensure accurate readings.
- Fin-Keel Vessels: Position the transducer 25 to 75 cm (10 to 30 inches) in front of the keel and no more than 10 cm (4 inches) to the side of the centerline to avoid the turbulence caused by the keel.
- Displacement Hull Vessels: Mount the transducer approximately one-third aft from the bow along the vessel’s waterline length and 150 to 300 mm (6 to 12 inches) to the side of the centerline.
In all cases, the transducer should be mounted parallel to the bow-stern axis, away from strakes, struts, fittings, water intakes or discharge ports, and any other features that create turbulence or air bubbles. It’s also vital to ensure the transducer is not in a location where it could be jarred during launching, hauling, or storing and is not in the path of the propeller on single-drive boats. On twin-drive boats, if possible, it should be mounted between the drives. The overarching goal is to mount the transducer in a position where it will be in clean, non-turbulent water for the most accurate and reliable performance.
Mounting Transducer on Different Boats
The right transducer mounting method for a boat depends on the boat’s type, size, hull material, and intended use.
Transom Mount is ideal for small boat sonar, especially outboard and sterndrive vessels. Thru-Hull Mount is best for larger, more sophisticated boats, often used in deeper waters. In-Hull Mount is suitable for boats with solid fiberglass hulls that don’t want to drill through the hull.
Let’s have a look at how to mount a transducer on some boat types.
Aluminum Boat
A transom mount transducer is the best choice for Aluminum boats. Here’s why:
- Non-Invasive Installation: Transom-mount transducers don’t require drilling into the hull below the waterline, which is particularly important for aluminum boats to avoid potential damage or corrosion issues that can arise from improper sealing of the hull.
- Easy Adjustability: Transom mounts can be easily adjusted or repositioned. This flexibility is beneficial as aluminum boats might require more fine-tuning to get the transducer placement right due to the hull’s material and shape.
- Good Performance for the Hull Type: While in-hull transducers are generally not recommended for aluminum boats due to signal interference with the metal hull, transom-mount transducers provide a direct and clear path for the sonar signal through the water.
- Cost-Effective and Less Complex: Compared to thru-hull options, transom mounts are generally less expensive and simpler to install and maintain, making them a practical choice for the typically smaller and more versatile aluminum boats.
A transom transducer is mounted the same way on an aluminum boat as on other boats. The key considerations of placement, avoiding areas of turbulence, and ensuring the transducer is parallel to the waterline remain the same. However, extra care should be taken to seal any drill holes properly to prevent corrosion, which is a particular concern with aluminum hulls.
Kayak
Mounting a transducer on a kayak typically involves an in-hull approach, especially for kayaks made from solid fiberglass or polyethylene. But for kayaks with specialized scupper holes or when in-hull mounting isn’t ideal, consider aftermarket solutions:
- Transducer Poles: Brands like Ram Mount or Scotty Kayak produce transducer poles that allow you to lower the transducer into the water from the side of the kayak.
- Scupper Hole Mounts: This method involves using a transducer mount that fits into the existing scupper holes on your kayak. Scupper hole mounting is very simple and does not require any drilling or permanent modifications to your kayak.
Pontoon Boat
Mounting a transducer on a pontoon boat is relatively straightforward due to its design. Here’s a brief guide:
- Choose the Location: Install the transducer under the pontoon, close to your console for easy cable routing. The back of the pontoon tubes, where brackets are often located, is an excellent spot.
- Use Existing Brackets: Utilize the brackets on the back of the pontoon tubes to mount the transducer. These provide a stable and accessible mounting point.
- Drill and Attach: Carefully drill holes into the bracket, ensuring not to damage the pontoon tube. Attach the transducer using the washer, nut, and bolt provided with your transducer kit.
By following these steps, you can successfully mount a transducer on a pontoon boat, ensuring it’s securely in place and positioned for optimal sonar performance.
FAQs
For various fishfinder brands like Garmin, Lowrance, and Humminbird, common FAQs related to transducers often include:
How to test a transducer out of water?
To test a transducer out of water, power it up connected to its display unit and listen for a series of ticking or clicking sounds indicating it’s sending sonar signals. Also, feel for slight vibrations on its surface. Remember, this won’t confirm depth-reading accuracy, just that it’s operational. For a full performance test, it must be in water.
Where to mount the side imaging transducer?
The Side Imaging transducer requires careful placement due to its unique capabilities. It must have a clear ‘view’ for the side-looking beams. This means no obstructions like the hull, motor, or other transducers. You might need to tilt the motor out of the way when using it. Also, it needs to be mounted parallel to the waterline. This ensures the side imaging sonar beams point straight down and display accurately, without needing deadrise adjustment. So, choose a spot with no obstructions and where the side imaging transducer can remain level with the water.
How to fix the transducer not reading depth?
If your transducer is not reading depth correctly, follow these troubleshooting steps:
- Check Connections: Ensure the transducer is properly connected to the display unit. Loose or corroded connections can cause issues.
- Inspect for Damage: Look at the transducer for any signs of damage like cracks, pitting, or wear. Even small damages can affect performance.
- Clean the Transducer: Debris, algae, or marine growth on the transducer can interfere with its ability to send and receive signals. Clean it gently with appropriate materials.
- Verify Placement: Ensure the transducer is correctly positioned. It should be fully submerged, away from turbulence, and parallel to the waterline for accurate readings.
- Check Settings: Review the settings on your display unit. Ensure it’s on the correct frequency and the depth range is appropriately set.
- Test in Known Depths: Test the transducer in waters where the depth is known and compare. This can help determine if the issue is with the transducer or the display unit.
- Software Update: Ensure your system’s software is up to date. Manufacturers often release updates that can improve performance and fix bugs.
How to fix the transducer not reading depth while moving?
If a transom mount transducer is losing depth readings while moving and there’s no issue with the transducer itself, the problem might be due to its placement or the type of boat:
- Transom mount transducers are generally not suitable for powerboats with inboard motors or sailboats. These boat types often create conditions (like turbulence or lack of water contact at speed) where transom-mounted transducers cannot function effectively.
- If you’re losing depth or bottom at speed, the transducer may be mounted too high. At higher speeds, the water flow can cause the transducer to lose contact with the water. Lowering the transducer so that it remains in constant contact with the water even at speed can improve performance.

